The Hazard Perception Test
Scanning for hazards
![]()
What is scanning?
Scanning means taking in the whole scene 360 degrees around your car. This is a key hazard perception skill that drivers need to use to avoid crashes. You need to scan constantly for hazards when you drive.
Effective scanning means constantly moving your eyes and/or your head when driving so that you can detect hazards that may arise ahead, to the sides and behind your vehicle. Research shows that new drivers are not good at scanning. They tend to focus on the road just ahead of their car. The good news is that new drivers get better at scanning with practice.
This section aims to help you become better at scanning so that you can detect hazards before they become a problem for you and other road users.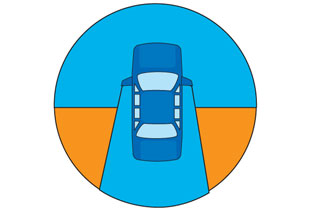
How to scan for hazards when driving
To scan effectively you need to move your eyes, your head and perhaps your upper body to get a good view of what is going on right round your car.
The picture below shows that you need a 360 degrees view (a full circle).
This means that you need to look out of the windscreen and the side windows to see what is shaping up ahead and to the sides. You also need to use your mirrors to see what is behind you. But your mirrors can't cover all of the view behind. You always have "blind spots" - areas not covered by your mirrors. To check your blind spots you need to turn your head and look out the side windows.
Blind spots will be different on each vehicle that you drive. Vehicle such as vans or trucks often have more blind spots than passenger cars.
Checking the blind spots with a head check is vital when you want to change lanes or when reversing.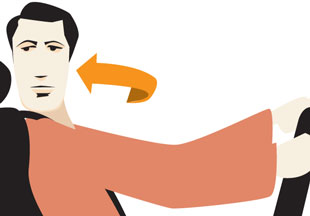
A head check where you look round over your shoulder is shown in the picture below.
A scanning routine
Experienced drivers constantly scan for hazards when driving. They do it automatically. To help you become better at scanning for hazards, here is a good routine to develop.
Look up to 12 seconds ahead. In a 60km/hour zone this means looking up to 200 metres ahead; on a freeway at 90km/hour it is up to 300 metres. The next picture shows what this looks like at 50km/hour. Scanning this far ahead gives you a chance to spot hazards that are shaping up well in advance (eg a broken down truck, an accident, the road narrowing to one lane). You will also have time to avoid them.
In heavy traffic, you may not be able to look 12 seconds ahead. But you are likely to be travelling more slowly which helps make up for this.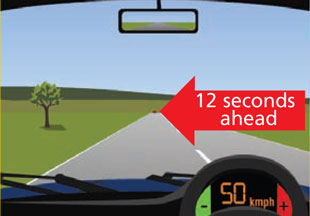
Scanning far enough ahead may mean looking through the windows of vehicles ahead of you to see what is happening. For example, by doing this you will know in advance if a car ahead is braking as you will see the brake lights come on several cars ahead. This gives you more time to brake if you have to. Scanning means that you are not just looking at the vehicle immediately in front of you.
Looking ahead also means scanning from side to side for hazards on the roadside or at intersections. Hazards may be parked cars, cyclists or pedestrians. Effective scanning means keeping your eyes and/or your head moving and not concentrating on just one spot.
Check your mirrors every 8-10 seconds. Things change behind and beside you when you drive. Unless you check your mirrors you won't know if someone is doing something such as trying to overtake or if there is a police car or ambulance coming up quickly.
Check your blind spots. Scanning ahead and checking your mirrors is usually enough when you are driving along in the same lane without turning or changing lanes. However, if you need to turn or diverge right or left, you need to know what is in the blind spots. Head checks enable you to check your blind spots.
Summary of scanning routine
Here is a dot-point summary of a good scanning routine:
- scan up to 12 seconds ahead
- check your mirrors every 8 - 10 seconds
- check your blind spots with a head check before you turn or diverge
This scanning routine is shown in the next picture.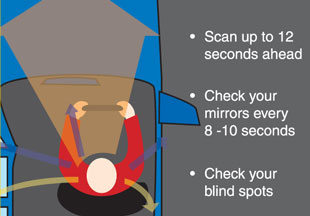
Your scanning routine needs to be constantly repeated as you drive. Of course if you detect a hazard and need to deal with it, this will be your first priority. But once this has passed, you need to return to your scanning routine.
Smart scanning
When you are scanning, there is a lot to look at and a lot to take in. It would be impossible to look at everything else that you see in detail. You need to be smart about the way you scan for hazards. This means sorting or filtering what is important from everything else that is happening. Here are some ways to make your scanning smarter.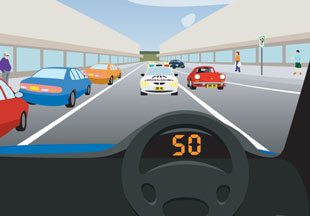
Look for change
Your vision is designed to pick up movement and change, not what stays the same. This means that moving hazards may be easier to spot than stationary ones like road works or parked vehicles. This can be a problem because you can get distracted by a fast moving hazard (eg a police car coming towards you) and miss a stationary one that may be of more immediate concern (eg a parked truck blocking your lane). You need to look for both moving and stationary hazards.
A hazard perception action plan
Through scanning and hazard perception you are trying to:
See road hazards (eg pedestrian waiting to cross the road ahead)
Think about what might happen (eg pedestrian might walk in front of your car)
Think about possible solutions ( eg slow down, change lanes or increase space between your car and pedestrian, sound horn)
Do something to remain safe (eg slow down and give the pedestrian more space)
This hazard perception process can be summarised as:
- See
- Think
- Do
Scanning is the "see" part of the process. Understanding that these three steps are the basis of good hazard perception can be helpful.
Of course, all of this takes place very quickly, sometimes in only a few seconds. This is why you need to practise in real traffic so that hazard perception skills like scanning become automatic.
Listening for hazards
While driving is mainly a visual task, listening can also help detect hazards. For example, you can often hear its siren before you actually see an emergency vehicle like an ambulance. Another example is motor cycles - they can be hard to see, but the sound of an engine can let you know there is one nearby.
To help you listen for hazards, it is good not to have the radio or stereo too loud when you are driving.
Avoiding fatigue
Fatigue (being tired and losing concentration) reduces your ability to detect and respond to hazards. Research shows that the more fatigued drivers are, the more hazards they fail to notice and the more likely they are to crash.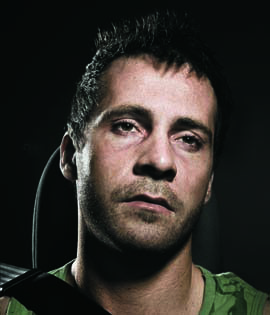
You don't have to drive long distances to get fatigued. Working long hours, partying hard and not getting enough sleep can make you fatigued. The only effective way to avoid fatigue is to get plenty of sleep. Fresh air, coffee and loud music won't work.
Do not drive at times when you would normally be asleep. Commencing a trip late at night or early in the morning, or driving through these hours, can be very dangerous. If you do drive long distances, take regular rest breaks at least every two hours.
Key points summary: scanning for hazards
- scanning means taking in the whole scene 360 degrees around your car - including any blind spots
- you need to scan constantly for hazards when you drive - look and listen for hazards
- use a scanning routine:
- look up to 12 seconds ahead - at 60km/hour this is about 200 metres, at 90km/hour about 300 metres
- look for change and movement in the traffic scene
- check your mirrors every 8-10 seconds - outside and inside mirrors
- check your blind spots with a head check before turning or diverging right or left
- Remember the hazard perception action plan:
- See (hazards)
- Think (about what might happen and what to do)
- Do (something to stay safe)
- avoid fatigue - fatigue and tiredness reduce your hazard perception skills
Tip:
Reduce distractions (eg radio, other passengers talking, things dangling from the inside mirror) when you are driving in hazardous situations (eg busy traffic, at night in the rain). This will make it easier to detect hazards. Don't make driving and looking for hazards any harder than it needs to be.
Practice exercises - Scanning for hazards
1. Blind spots on your car
Ask someone to help you check where the blind spots are on your car. With the car parked safely at the roadside or in a driveway, check that your mirrors are adjusted properly. Roll down the windows. Ask your assistant to walk very slowly around the car. Watch carefully in the mirrors, but don't turn your head. Call "Stop" when your assistant disappears from view. Adjust your mirrors again and see if you can reduce the blind spot area and still get a good view of the road behind. Repeat the process with your assistant again. Did you manage to reduce the blind spots?
Repeat the process again. When your assistant is in a blind spot, try turning your head to do a head check. Can you see them or does part of the car still block them?
Once you have completed this process, you will know where the blind spots are on your car and how large they are. You will also know to what extent head checks compensate for them.
2. Scanning routine
Practise the scanning routine summarised in this section. Start with:
- scan up to 12 seconds ahead
- check your mirrors every 8 - 10 seconds
- check your blind spots with a head check before you turn or diverge
Try it with the vehicle stationary at the side of the road. When you are confident that you have the routine worked out, try it in various speed zones. Start with 50km/hour, then progress to faster speed zones. Start on quieter roads, then progress to busier ones.
Using the "one-thousand and one, one thousand and two, one thousand and three" counting technique, practise estimating what scanning 12 seconds ahead looks like at various speeds. You may be surprised at how far ahead you need to look.
3. Comparing notes on scanning
Ask your Qualified Supervising Driver to help you with this practice exercise.
Map out a circular route through a nearby built-up area that will take you about 5-10 minutes to complete. Include traffic lights, Stop signs and areas where you are likely to come across other road users such as pedestrians.
Ask your Qualified Supervising Driver to drive the circular route, with you travelling in the passenger seat. Scan the road as though you are driving. As your Qualified Supervising Driver drives the circular route, ask them to tell you where they are looking, what they are looking at and what they consider to be hazards. Questions like "What are you seeing?" and "What are you going to do now?" might be appropriate.
This technique is called "commentary driving" and is used by driver trainers and some licence examiners to find out where a driver is looking, what hazards they are seeing and what they plan to do about them. It might be a bit difficult for you and your assistant to do at first, but it gets easier with practice.
Are they looking at the same things as you?
Did they spot hazards that you don't? Do you agree on what may be hazards? Did they respond to hazards in the way that you would have?
When your Qualified Supervising Driver has finished driving the route, stop somewhere safe and talk about it.
Once you have talked about how you and the other driver scanned for hazards, swap positions so that you are driving. This time drive the route in the opposite direction. Your Qualified Supervising Driver will be scanning the road as though they were driving. As you drive along the route tell them where you are looking, what you are looking at and what you consider to be hazards.
Stop somewhere safe and compare notes. Are you looking at the same things as your Qualified Supervising Driver? Do you spot hazards that your Qualified Supervising Driver didn't? Did you agree on what may be hazards? Did you respond to hazards in the way your Qualified Supervising Driver would have?
This technique of practice through comparing your scanning with a more experienced driver is a very useful learning tool. If possible, try it with a range of other Qualified Supervising Drivers who vary in age and driving experience. Use it often to build and refine your scanning skills. You can never get enough scanning practice.
54-61


